Here is a quick guide to fixing wifi connected but no internet access on pc or laptop running Windows OS.
Have you ever seen a yellow colour Triangle symbol flashing on your Laptop’s Wifi signal? I’m sure; many Windows OS users have encountered this issue numerous times.
It’s one of the common and the most frustrating issue one can ever face on Windows. Since a very long time, people are facing the issue, and nowadays the problem seems to affect systems quite frequently.
“Wifi Connected But No Internet Access” isn’t some complicated issue, in fact, it’s a simple error. However, the effect of this problem cannot be expressed in words.
Like Seriously, you have everything setup correctly (Wifi/Ethernet) and unknowingly all of a sudden you start seeing pop up which implies that you cannot access the internet, although you have connected to a Wifi Network.
I’m sure you came here in search of a solution for this annoying issue, didn’t you?
Well, you don’t need to worry anymore! We’ve found a couple of fixes that can actually help you in getting rid of this issue. The methods which you find in this article will solve almost all the internet connectivity issues such as “wifi hotspot connected but no internet access” or “Wifi Connected But No Internet Access.”
But before jumping into the guide straight away, it’s important to know the causes of this issue. You cannot simply solve an issue before knowing the cause and origin of it.
Contents
Causes for Wifi Connected But No Internet Access Problem
Now there are various reasons and things that need to be considered to study the cause of this issue.
You have to know that this issue doesn’t come randomly and for no reason. There must be something wrong or outdated on your PC or laptop, and the result of that is this issue.
So, let’s look at few things that are most likely favorable to cause this irritating error. This issue will stay as long as you don’t do anything to get rid of it.
It may even start occurring at frequent intervals if you do not fix up your PC or Computer.
- Outdated Drivers: First and the most common cause of this issue is drivers which are outdated. If you haven’t installed any driver updates since ages, then you will most likely face this issue once in a while. It is always recommended to keep your networking drivers up to date. The drivers can be found your Laptop’s manufacturer website.
- Router Issue: Routine issue may not be the cause in your case, but a lot of people have faced this issue as the firmware of their router was outdated. If you have a really old Wifi Router, then consider getting yourself a brand new one to avoid this issue from happening in near future,
- Operating System: If you have recently updated your Windows Operating System, then it might have changed the registry values. Installing software related updates are the most common way to face this issue. Downloading updates from an authorized site or third party site can also be said as the cause of this issue.
- DNS Error: You will start facing this issue whenever your PC fails to get the IP address or DNS address. If you did a hard reset of your OS, then you would most likely face this issue, and you need to carry out all the settings again to get rid of this problem.
Wifi Connected But No Internet Access (2018) – Fixed
Here are some working methods that you can try out on your Laptop or PC to avoid facing this problem. Some; may not solve the problem entirely, so you need to try the remaining methods to get rid of this issue Wifi Connected But No Internet Access.
Re-Install Wireless Network Card Drivers
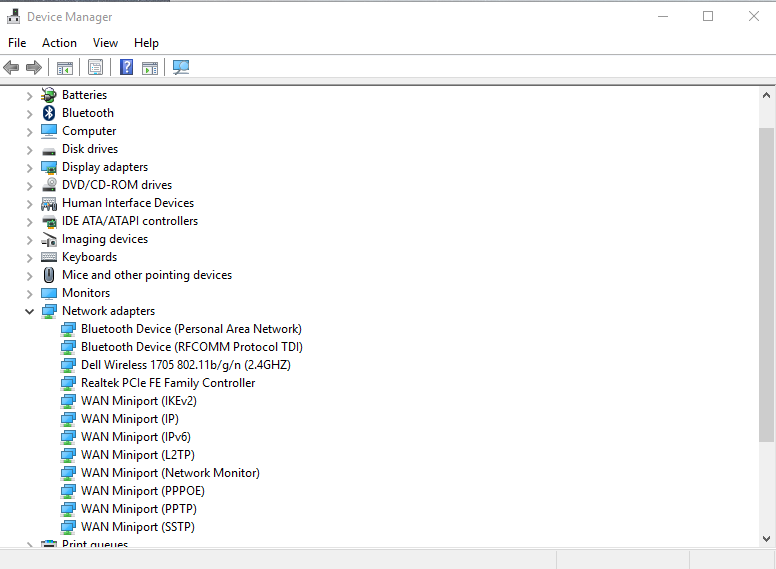
First of all, go to your Device Manager and uninstall the Wireless Network Card driver from your system.
Simply type “Device Manager” in the search field, and you will see the option to open device manager. Once you open it, it would look something like this.
Right click on your Network card and uninstall it from your system. Don’t worry; nothing will happen! Now to go to “Action” menu and click on “Scan for Hardware Changes.”
This will automatically install the driver again on your system. That’s it, this will probably solve the issue, and you can start using the internet as usual.
Configure Internet Protocol Properties
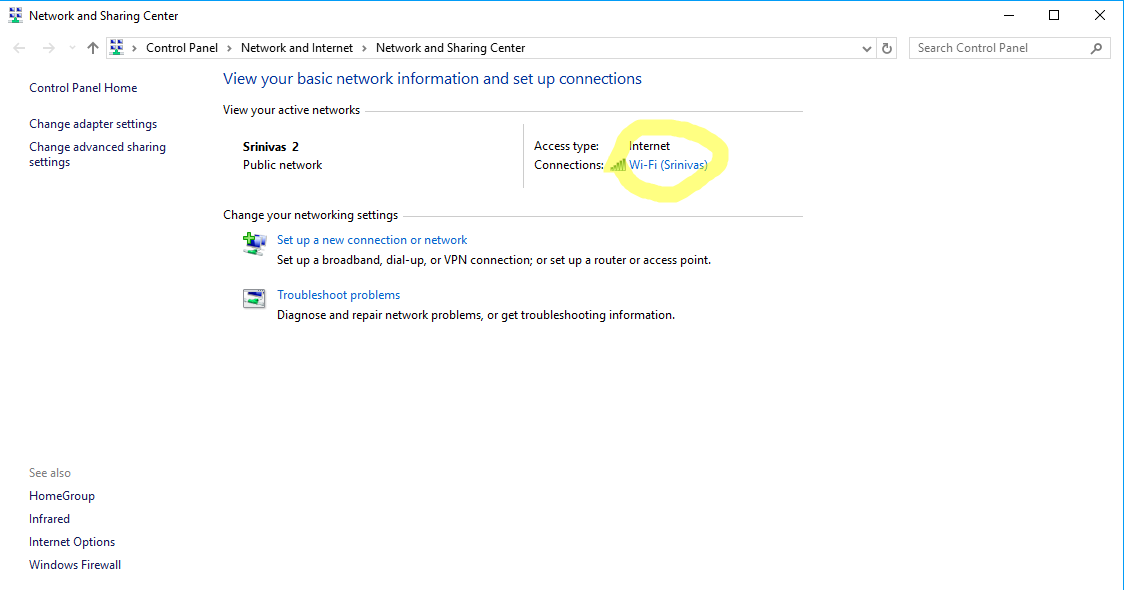
In this method, you need to open “Network and sharing center.” You can do so by entering the name in the search option of your Windows. There you will find the Wifi network name that you connected to, just click on it to open the settings. Look up the image for reference.
In the settings, click on Properties to proceed further in the process. You can take help of images to know where the options are located.
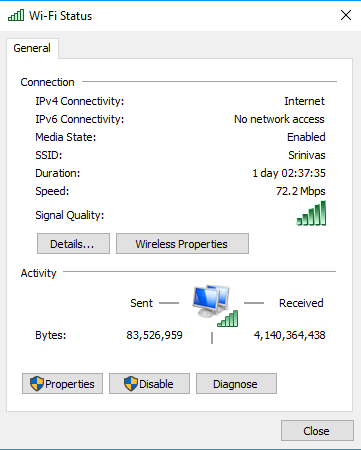
Make the settings as shown in the Image and click “Ok” to confirm the settings. Now reboot your PC or laptop and establish a connection.
It will definitely start working as usual. Hope it helps in removing the Wifi Connected But No Internet Access problem.
Troubleshoot your Windows PC
Another method to fix this issue is by using the Troubleshooting system of your Pc or Laptop. It comes built in every system, so you don’t need to install any third party app to do so.
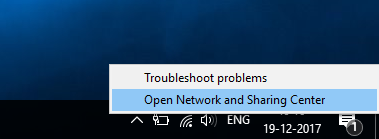
Just right-click on your wifi connected signal, and you should see the option of “Troubleshoot Problems.” You can check the below image for reference purpose.
Once you start the troubleshooting process, the system will analyze all the functions of your laptop or Computer.
If there’s anything wrong with your system’s drivers, you will be provided with on-screen instructions to download or update the latest driver.
You can also upload the driver from your PC if you have already downloaded it. In case, if there’s something which system itself cannot fix, then it will provide the relevant sources to get help from.
Practically, this method isn’t really helpful, but still, there’s no harm in giving it a try. Most probably the system will not be evaluating the minor bugs during troubleshoot.
So, most of the times you would get the result of No Issues. But as I said, it’s good if you give it a try. It will you in knowing if there’s any major issue with your PC or Laptop.
Change the Network Mode
Another method of solving this issue is by changing the Internet mode on your PC or laptop. Usually, people connect their ethernet cable to their systems to access the internet.
Sometimes there will be a communication restriction or barrier between the Ethernet And Computer. Thereby, your system will not be able to send or receive any data.
A very common and simple method is to connect your Laptop to a Wireless Internet Connection. This isn’t actually a fix, but it’s more like a tip to easily access the internet whenever you start facing this issue.
If you are in a hurry, then establishing connection via Wireless mode is the simple way to get access to the internet. Follow the other methods for a permanent fix of this issue.
Change Wireless Mode on Router (Modem or Dongle)
Changing the wireless mode on your Router can help in getting rid of this issue. Well, it’s a bit lengthy process compared to other methods, but it’s worth trying.
So first of all, you might have seen some numbers like this 802.11 b/g/n/ on your PC or even in the dashboard of your Router.
Well, B, G, N refers to the standard of wireless mode. The one which I mentioned above is the default mode and works pretty fine on all situations.
But whenever, you run into such issues, changing the wireless mode is the best option. So, in order to change the standard wireless mode of your Router, you need to follow a few simple steps.
- First of all, open up the dashboard of your Router by entering the password and ID. The process of accessing the Dashboard will different depending on the router you have. Usually, the process will be mentioned in the instruction manual that you get with your Wifi Router.
- Now head to the Menu called “Wireless Mode.” There you will find the option to set the password and name of your Wifi. Below that there will be an option called wireless mode.
- Just click on wireless mode and select 802.11 b option, save the changes and close the dashboard.
- Now you just need to restart your Wifi Router, that’s it. Your access to the internet will be restored on the startup of your Wifi Router.
This method may look complicated to you, but it has the highest success rate compared to any other methods. Just go ahead, and try it out.
Some routers may have different options hidden under Menus; it’s better to check all the options to find the perfect setting.
Reset Router or ISP (Internet Service Provider)
Here’s another quickest and easiest method to prevent the issue of “Wifi Connected But No internet access” from happening.
Most probably, this issue arises when there’s something wrong with your Router. Any minor technical errors can also be the cause of this problem.
So in order to get rid of this issue, you can reset your Router. This will solve almost all the firmware issues that your router might have. Also, keeping the router’s firmware up to date is an important thing to avoid such Wifi Connected But No Internet Access issues.
To reset the router, merely turn the Wifi Router around. There you will find a small button to reset your router, just hit it and let the router do its job. It may take a couple of minutes to get things back, but once the reset process is completed, you can start browsing the web.
Do keep in mind that after reset, the name and password of your Wifi Network will revert back to default settings. You need to make the changes again by doing into the dashboard to restore old credentials.
Reset the Network
Sometimes you may need to reset your Network to restore the access to the internet. This can be done from your system itself; you don’t need to touch your router or anything else. Just follow the below steps to know how to reset your network to get rid of the issue Wifi Connected But No Internet Access.
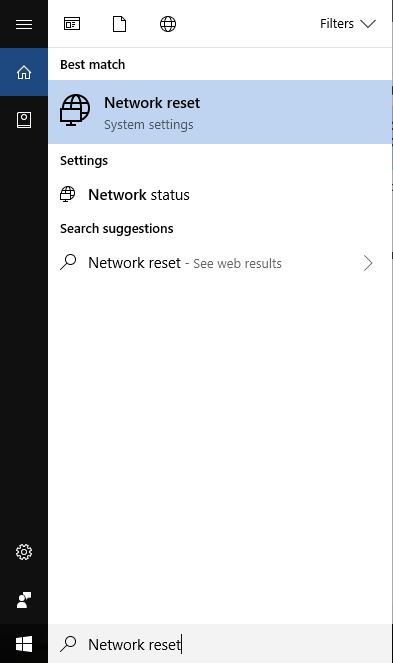
- Type in the “Network Reset” in the search option of your Windows System.
- You will immediately get the option of Network reset from where you can reset your Network. (Check the image for help)
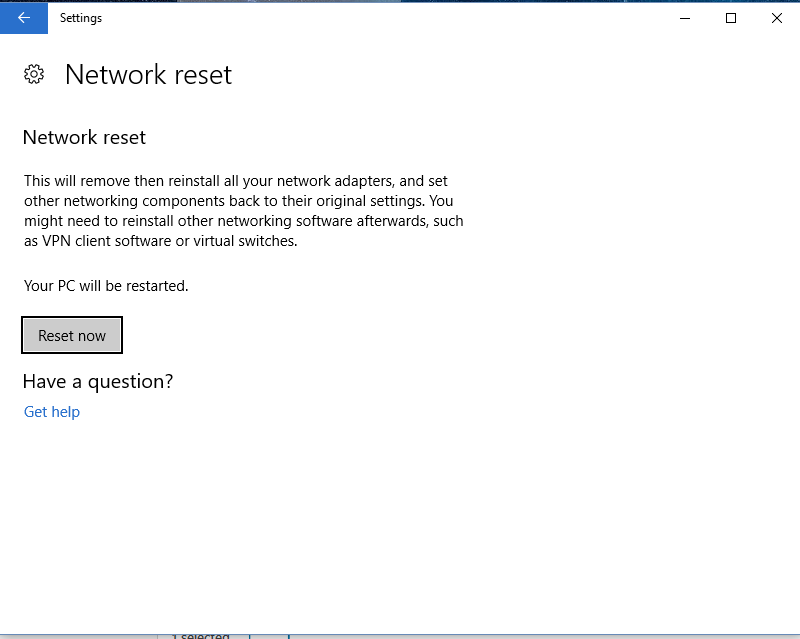
- Just click on it to go further, on the next screen you will find the option to reset the network. Just select and wait for a couple of minutes. Take help of the image in case if you are not able to find the option.
Once the network reset is completed successfully, reboot your PC or Computer. Now connect your system to the Internet via Wifi or Ethernet.
The system will automatically start sending or receiving the data; now you can begin to browsing the web as usual.
Still facing the Laptop Connected Wifi But No Internet Access Issue?
A lot of laptops face this issue on a regular basis; you can get rid of this issue permanently with just a simple fix. First of all, you either change the Wifi network name and Password of your Wifi, then connect your Laptop.
It will definitely start working like before; this is just a simple fix that actually works with many laptops.
You can follow the methods mentioned above as well on your laptop, in case if the issue persists, then the issue might be with your Wifi Router.
So you have just replaced your Wifi Router with a new one. Alternatively, you can also try reinstalling the OS on your Computer or Laptop. But don’t forget to try out the above methods as they are very well tested and verified.
Other articles you may like:
How to Fix SSL Connection Error on Google Chrome (Android)
How to Fix Mobile Network Not Available (error) on Android
This Copy of Windows is not Genuine [Fixed]
Wrapping Up
Internet connectivity issues are really annoying in times when you are in hurry sending an important email, etc. But, you can put full stop to such an issue on your Windows computer by following few tricks. I have provided a bunch of working tricks using which you can fix wifi connected but no internet access. Share this material with your friends, thank you.

Leave a Reply